As Randy has pointed out in his introduction to this “Myth Beyond Words” series, the visual medium of illustration presents a challenge for storytellers. In this article, I will examine some early illustrations of Aesop’s fables from the 1479 edition of Aesop’s fables authored by Heinrich Steinhowel, one of the great humanist scholars of the early Renaissance. Throughout the fifteenth and sixteenth centuries, the text of Steinhowel’s fables was translated into many different European languages, and the accompanying woodcuts (nearly 200 of them) were also widely copied. These woodcuts demonstrate an ambitious attempt to use single-panel illustrations to depict the plots of a fables, while also showing how the illustrations themselves can yield new versions of the tales and become part of the storytelling tradition.
A typical fable usually has a two-part plot sequence: the confrontation, and the outcome. Unlike modern comic book art, where a plot sequence can be shown in a series of panels, in these illustrations the artist uses only one panel to depict the plot. In that one panel, the artist may depict the confrontation, or the outcome, or both, as you can see in the examples below. In each case, however, the reader must still apply additional information in order to get a mental picture of the whole story. That additional information might come from the text, or it might come from the storytelling tradition itself, since many of these fables were well established in European folklore and well known in the oral tradition long before being printed in books.
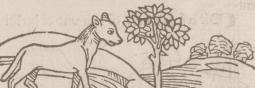
In the famous story of the wolf and the lamb, for example, the wolf accuses the lamb of muddying the water, while the lamb protests that he is innocent; this is the confrontation. The wolf eats the lamb anyway; this is the outcome. The artist has chosen to render the confrontation scene, including the important detail that the lamb is drinking downstream from the wolf. Any reader who knows the fable already can supply the outcome based on what they see here.
 From Steinhowel’s Aesop, 1479. View larger image »
For an illustration which shows the outcome instead, consider the frog and the mouse. The frog offered to help the mouse cross the stream, and the mouse tied itself to the frog so that it would not drown. The treacherous frog then plunges under the water, trying to drown the mouse; this is the confrontation. In the outcome, a passing kite swoops down and carries away both the mouse and the frog. For readers who know the story, the confrontation is can be easily deduced from the dramatic denouement.
 From Steinhowel’s Aesop, 1479. View larger image »
Sometimes the artist shows a series of events occupying the same space even if they unfold separately in time. Consider, for example, the story of the old lion: he is attacked first by a boar, then by a bull, and finally by a donkey, which is the most humiliating of all. The illustration shows all three attacks as if they were simultaneous, but readers who know the story realize that the attacks happen in a sequence, culminating with the despicable donkey.
 From Steinhowel’s Aesop, 1479. View larger image »
Meanwhile, to understand the meaning of the fire coming out of the boar’s mouth, you need a knowledge of the Latin text of the story, which explains that the boar had dentes fulminei, “teeth that flash like lightning.” With this detail, the Latin text exerted a specific, direct influence on the illustration; later on, we will see an example of an image which instead challenges the text.
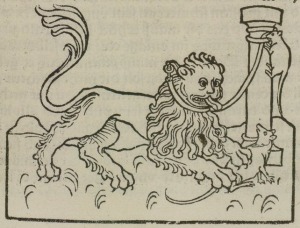
But first, let’s look at another example of multiple scenes in a single panel, the story of the lion and the mouse. A lion caught a mouse, and the mouse begged for mercy, promising he would do the lion a favor in the future. The lion scoffed, but let the mouse go. This is the mouse in the lower right, pinned under the lion’s paws. Later, the lion was caught in a snare and the mouse then chewed through the ropes, setting the lion free. This is the mouse in the upper right, chewing through the rope wrapped around the lion’s neck. Without the text of the story, you might think there are two mice, but there is really only one. In addition, you might think the lion is caught in a snare when he traps the mouse, but not so: you are seeing two different moments of time, superimposed.
 From Steinhowel’s Aesop, 1479. View larger image »
You can even find sequences of three scenes combined into a single panel, as in the story of Zeus and the frogs. As the story begins, the frogs ask Zeus to give them a king, so he hurls a log down into the water; you can see Zeus hurling the log on the left. At first the frogs are impressed by the big splash made by the log, but they grow bored with their king, and hop on the log to show their contempt. You can see the frogs hopping on the log in the lower right. They then ask Zeus to send them another king, so he does: you can see the bird (a stork? a crane? a heron?) in the upper right, as he eats his subjects one by one.
 From Steinhowel’s Aesop, 1479. View larger image »
But where did this bird come from? The text accompanying the image says it was a water snake, not a water bird, who devoured the foolish frogs. All the classical and medieval Latin texts are clear on this: Zeus sent a snake to devour the frogs. Did the artist know a different version of the story? Or did he simply prefer the bird for artistic reasons of his own? Whatever its origin, the bird in the illustration to Steinhowel’s Aesop in 1479 became firmly established in the tradition of Aesop illustrations, as you can see here in Hieronymus Osius’s verse fables published in 1574. The illustration features a bird, even though the Latin text still maintains that it was a snake which ate the frogs.
 From Osius’s Phryx Aesopus, 1574. View larger image »
Over time, the bird not only inhabited the illustrations of the fables, but also started to appear in the texts as well, both in Latin and in the other European languages. Let’s leap forward in time several hundred years, to the lovely Baby’s Own Aesop of 1887, illustrated by Walter Crane; by this time, the water snake was long forgotten and Walter Crane did not even realize that “King Stork” was a late medieval interloper in the history of this fable. The image, the text and even the title of the fable now all refer clearly to a stork, with no trace of the snake to be found.
 From Walter Crane’s Baby’s Own Aesop, 1887. View larger image »
As folklore, Aesop’s fables are always shifting and changing in their various retellings, and the images used to illustrate the fables, just as much as the words, are part of that creative tradition. The images are not simply extras added on to the story. Instead, these images can contribute their own distinctive elements to that endless mix-and-match process by which new versions of the fables are created — a process which has kept the Aesop’s fable tradition going strong for three thousands years, and counting.
Works Discussed
- Steinhowel, Heinrich. Aesopus: Vita et Fabulae. 1479. (Illustrations available online at Aesopica.net.)
- Osius, Hieronymus. Phryx Aesopus Habitu Poetico. 1574. (Available online at Aesopica.net.)
- Linton, W.J. The Baby’s Own Aesop. 1887. Illustrations by Walter Crane. (Available online at Aesopica.net.)